Monday, August 11, 2014

Reset BizTalk Server MsgBox Database – for all Developers


Did you find your Development Machine performing slowly, its time to clean up the Message Box and Tracking Data..
** This should be executed on the development/test machine only. Executing this in Production will lead to loss of data **
Here are few steps to clean up BizTalk Message Box Database.
1. There is a Stored Proc bts_CleanupMsgbox in BizTalkMsgBoxDb Database. By default this stored proc does nothing. It’s Dummy. This is to prevent accidental execution in the Production Server.
2. Execute a script to recreate bts_CleanupMsgbox. Script can be found at <BizTalk Dir>\Schema\msgbox_cleanup_logic.sql. This script should be executed in BizTalkMsgBoxDb Database.
3. Stop BizTalk services from the Services (Start -> Run -> Services.msc).
4. Reset IIS server incase if you have any running isolated host instances
5. Execute stored procedure bts_CleanupMsgbox on your message box database
This SP will take an input parameter @fLeaveActSubs.

Values for this should be ‘0’ or ‘1’. ‘1’ is the default in case if you don't supply a value.

Setting the value to ‘0’ results in clearing the active subscriptions and you may have to redeploy the application. Think twice before doing this.
The above will not clear off all the subscription but will mark for deletion .
6. Execute the stored procedure bts_PurgeSubscriptions on your message box database to purge them all.
7. Start BizTalk services
To clean up the Tracking data in BizTalkDTADb Database:
1. Stop BizTalk services from the Services (Start -> Run -> Services.msc).
2. Execute stored procedure dtasp_CleanHMData on BizTalkDTADb database.
3. Start the BizTalk services

Using BizTalk Server Config File - BTSNTSvc.exe.config

Assume that you have a Class Library where all the commonly used functions are written and compiled.
If that class library uses any keys from an app.config file, how will you add those keys in BizTalk Server Run time?
Answer is very simple.
BizTalk Server too has a config file which will be access during run time.
So, if you use any external library in any orchestration and if that External Library needs any key values from Config file, all those key value pairs should be copied to the BizTalk Server Config file for the Orchestration to run properly.
BizTalk Server config file can be found the below location.
32 Bit:
C:\Program Files (x86)\Microsoft BizTalk Server 2009\BTSNTSvc.exe.config
 64 Bit:
C:\Program Files (x86)\Microsoft BizTalk Server 2009\BTSNTSvc64.exe.config
So, next time if your external library is using any config file, make sure that all those keys are also there in BizTalk Server Config file.
Note: Once the config file is updated, host instance should be restarted to reflect the values.

Enable BAM Continuation between Receive & Send Ports using Tracking Profile Editor

This is a simple post to show why and how to enable Continuation between Receive & Send Ports. I am going to use Tracking Profile Editor for this example.

1. Create a simple BizTalk Application with two schemas and a Map between the two schemas.


2. Build & Deploy the application. Create a File Receive Port (RP_BAM) and File Send Port (SP_BAM). Use map in the Receive Port inbound transform.

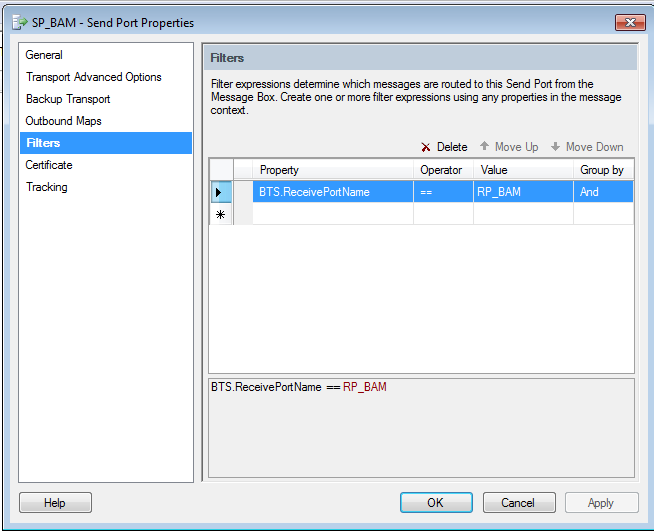
 3. Create a Send Port and use Receive Port Name as the Filter to subscribe the transformed message.

4. Now, I am going to create an activity that displays the Product Name, Quantity, Unit Price (captured from the Receive Port) and Total Price (captured from send port after the map)
5. Open Excel. Add a new Activity.


6. Add four Business Data Items as below. Save the Activity to Product.xml file.


7. Complete the activity and create a new View.


8. Give a name and select the Product Activity which is just created and select all the Activity Items.


9. Leave rest of the pages in wizard as default and complete the View creation.

10. Deploy the Activity using the command  
bm.exe deploy-all -DefinitionFile:”<C:\Data\BAM\Product.xml>”


11. Open Tracking Profile Editor and open the activity you just deployed. From the Event Source, select Messaging Payload and Select the source schema deployed.


12. Map Unit Price, Name and Quantity from the schema to the Activity Items.


13. Right click Name and Select Set Port Mappings -> Select the Port that was configured in Admin Console to receive this message. Do the same for Unit Price and Quantity. This step is to indicate that, these fields are to be populated from message coming through the selected Receive Port.


14. Now select Message Payload again from the Event Source drop down and select the Target Schema.(to fill the Total Price item)


15. Map the Total Price from the target schema. Select Port Mapping and choose the send port which is going to hold this Target message.


16. Go to Tools and click on Apply Tracking Profile


17. Now test your deployed application by dropping a file. Open BAM Portal.
18. Instead of seeing a single record in the BAM, you will see two records. One Contributed by the Receive port and the other from the send port. Ideally both the ports should contribute to the same record.


19. To resolve this, Continuation should be enabled between the two Ports.

20. Come back to tracking profile editor. Right Click the Product Activity Node and Select New Continuation


21. Select Messaging Property from the Event Source, Map the Interchange Id to the Continuation Folder. (You can use any of the common property between the Received & Sent messages. Interchange Id is generally common between receive and send).


22. Right Click the Interchange Id -> Set Port Mappings -> Map the Receive Port.


23. Right Click the Product Activity Node and Select New Continuation Id.

24. Rename the Folder as “Continuation” (the idea is both the folders should have same name). Map again the same Interchange Id to the newly added folder.


25. Right Click the Interchange Id -> Set Port Mappings -> Map the Send Port this time.


26. You are done. Go to Tools -> Apply Tracking Profile. Test again by dropping another file. This time, you see that only one record comes for both the Receive Port and Send Port.

Hope this gives you an idea on how to enable continuation using TPE.

Installing / Adding Business Activity Monitoring (BAM) Add-In to Microsoft Excel

In case if you install Microsoft Excel post BizTalk Server installation, you might not see Business Activity Monitoring – BAM add-in in Excel. 

In Excel, you can go to File Menu -> Options


Just click on Go. In the Add-In dialogue, click browse


Go the folder “C:\Program Files (x86)\Microsoft BizTalk Server 2010\ExcelDir” and locate the file “Bam.xla”.


This will add BAM Add-In to Excel.


---OR---

In order to work temporarily with BAM, you can just open the file at the path “C:\Program Files (x86)\Microsoft BizTalk Server 2010\ExcelDir” instead of adding it to Excel.

No Views are displayed in BAM Portal

We may wonder why even after successful deployment of BAM activities and views, why views are not getting displayed inside BAM Portal?

The straight reason is – Lack of permission.

Normally when the user have admin rights on the system the views should be automatically displayed inside the portal.

But sometimes even for the administrator they wont show up. For this, we should add the Views under the logged user account to see the them in the BAM portal.

In order to set the permission, open command prompt and go to the path where Views are stored.

Now set the path attribute to “C:\Program Files (x86)\Microsoft BizTalk Server 2009\tracking” and execute the permission command. 

bm add-account -accountname:domain\userid -view:viewname

Now it should show up.

Wednesday, August 6, 2014

Supress / Nullify / Terminate a Message in a Pipeline Component

Recently I had a situation, where in I need to analyze the Contents of a Message (sent by an existing application) in a Pipeline Component.

However, I have no subscribers for that message and I don’t need to send that message anywhere.

In this case, I wrote a pipeline component to suppress that message.

This pipeline component needs to extend IComponent, IComponentUI, IBaseComponent interfaces.

In the Execute method of IComponent interface, just return Null. This message will then be ignored by BizTalk automatically without any Suspended Messages / Event Logs.


How to change the output file name in BizTalk File Adapters?

In Many situations we may have to save the file in the Output folder in a proper format.

BizTalk Send Port with File Adapter supports the following formats (macros) for the files saved.

%MessageID%
%datetime%
%SourceFileName%
%time%

Incase if we want the output file name to be some thing other than the available macros, we need to do some coding either in the Orchestration or in the Pipeline.

This post will show you how you set the output file name in an Orchestration.

Scenario: 

Create a schema, receive a file of that type and set a name for the file and save it back to an output folder.

1. Create a sample schema in a BizTalk Project and add an Orchestration to the project.
2. Create two messages of the Schema Created in above step
3. Add a Receive, Message assignment and Send Shape as shown below.
4. Configure the Receive shape to Receive Message_1, set activate to true.
5. Configure the Construct Message shape to construct Message_2 and Send shape to Send Message_2. Resulting Orchestration should look like below.


6. Add the following code in the Message Assignment shape.

Message_2 = Message_1;
Message_2(FILE.ReceivedFileName) = “MyOutputFile”;

7. Add a receive and send ports and complete the Orchestration.


8. Deploy the Orchestration.

9. Configure the Send Port File Adapter as show below. (Change the file name to use %SourceFileName% Macro. (Case Sensitive)


10. Drop an instance of the Schema in the input folder, and see that the Output file name will be the same as what I have given in Step6.


The idea behind this is that, I have change the ReceivedFileName Context Property of the message received to my desired format and then I have used the % SourceFileName% macro.

The same can also be done using a Pipeline.